Introduction
As a team of three undergraduate students, we were tasked with building a concept self driving car in our winter semester. Not having much experience in data science or machine learning meant that the production process was a mess, although looking back we probably could have made the same amount of progress in a fraction of the time.
This article is for those who are interested in what it takes to build a functioning self driving car in record time, on a budget, without the headaches that we had to go through! I don’t go too much in depth on all the details but there are a few snippets of code to spice things up. Also if you are interested in the code you can help yourself to our Github page, https://github.com/RoboticsCourse, but be warned that it’s not documented and was not created for general use.
What We’ll Need:
- Remote Control/Demo Car
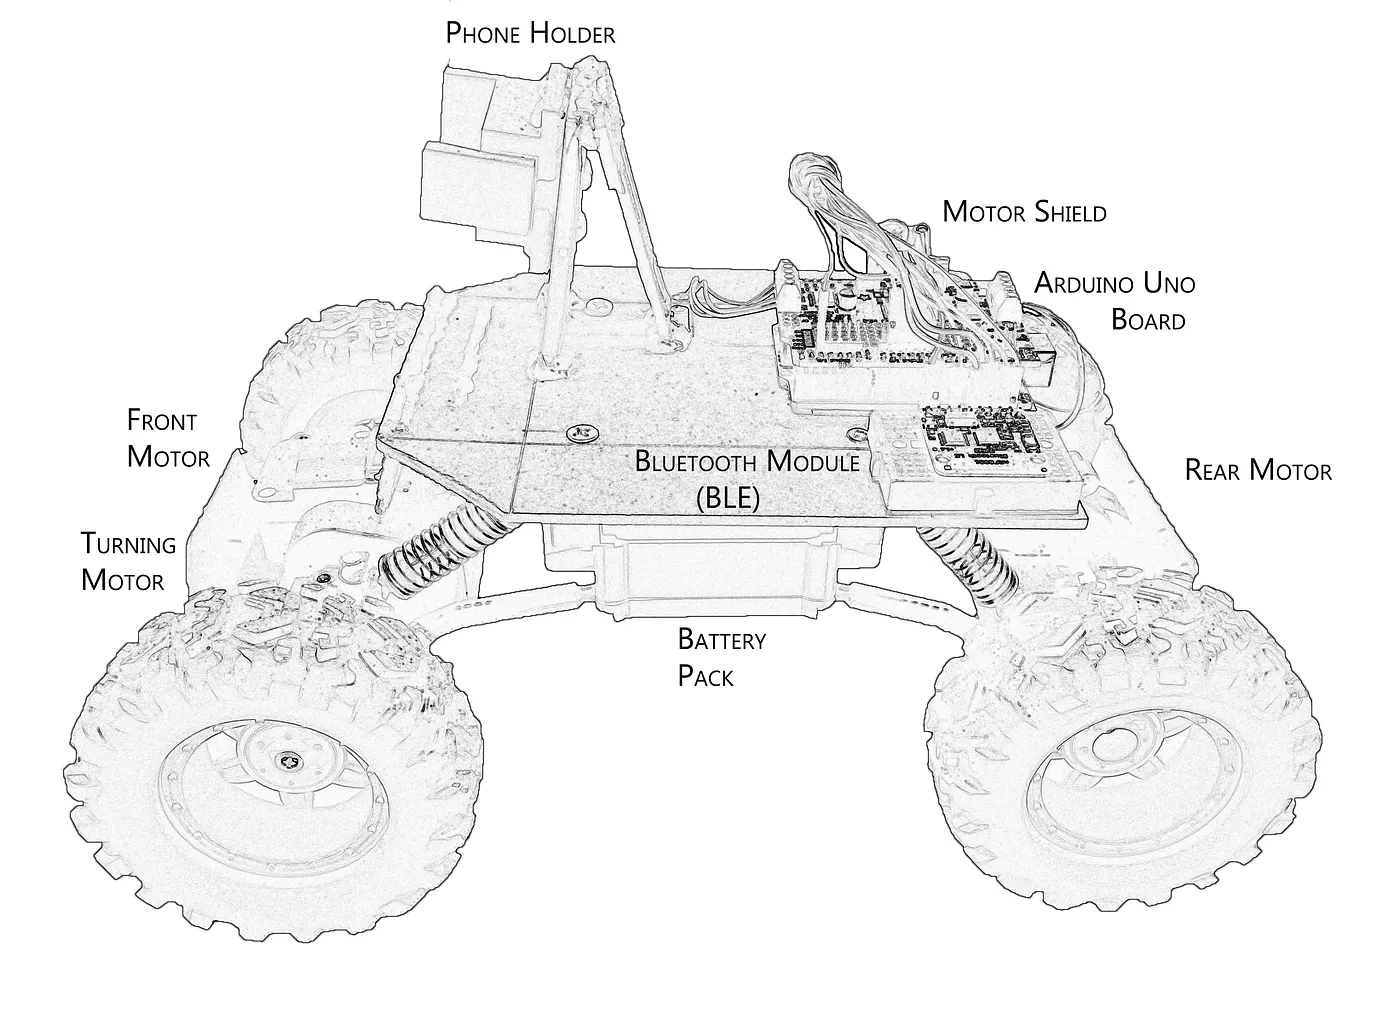
- Arduino Uno board
- Motor Shield
- Bluetooth BLE Module
- 2 Mobile Devices
Cars are meant for driving
First of all, we wanted to finely control the motion of the car, and the best way to do that was to throw away the controller that came with the original car and instead use an Arduino board. Since they’re programmable and compatible with a whole suite of additional modules which we could buy online for cheap, it was amazing for prototyping. The board we used was the Arduino UNO Rev3 which you can get for $20.
Now to actually be able to control the car via the Arduino board we had to hook it up to a Motor Shield which is a useful little add-on that gives you the ability to power a variety of motors from your Arduino board with just a few lines of code. The snippet bellow shows a simple implementation.
 1void Navigation::goForward(int speed) {
 2    frontMotor->setSpeed(speed);
 3    frontMotor->run(FORWARD);
 4    rearMotor->setSpeed(speed);
 5    rearMotor->run(FORWARD);
 6}
 7
 8void Navigation::goBackward(int speed) {
 9    frontMotor->setSpeed(speed);
10    frontMotor->run(BACKWARD);
11    rearMotor->setSpeed(speed);
12    rearMotor->run(BACKWARD);
13}
14
15void Navigation::SteerSpeed(int speed){
16  if(speed > 0) turnMotor->run(FORWARD);
17  else {
18    speed *= -1;
19    turnMotor->run(BACKWARD);
20  }
21  turnMotor->setSpeed(speed);
22}
An important implementation challenge was that there is no way to specify distances that the motor will be doing useful work over but instead you must pass in the speed the motor will turn at and the time interval. This means that deepening on the amount of power supplied by the motor, you are responsible for fine tuning these measurements.
Ours ran three DC Motors which were well supported by our Motor Shield. This setup guide really helped us set up and run this configuration.

Now that the Arduino + Motor Shield were all hooked up, and the motors were buzzing we gained the ability to control the car through its new small Arduino brain. However this early in the project it could only follow pre-programmed instructions in a loop and it was time to test what we’ve built.
Manual Control
The next step was to hook up a way to control the car manually, which turned out to be really useful in the training phase. A really handy module available in the Arduino arsenal is the Bluetooth Low Energy chip (BLE). The setup is quick and there’s available example source code for mobile devices to BLE connection so it only took us some minor tweaking to get the board connected to one of our phones.
We used an Android phone to interface with the chip, the the help of this BLE Android project. That sample code is an example of Bluetooth text messaging which is very similar to what we’ll be doing to communicate with the car, in fact our implementation will be even simpler.
All it takes is to scan for local Bluetooth devices and connect to the chip, after which we can start sending and receiving messages in a few lines of code! This gave us the freedom to go wild with the input type for the car controller, with my preference being a simple joystick. By sending messages such as S10 (Steer Left at speed 10) or F -100 (Go backwards at speed 100), with S representing the steering motor and F representing the front and back motors, we could encode directions for the car in just a few bytes.

The latency between the controller and the car proved to be nonexistent and even worked for up to 10m away with no issues. At this point the car was controllable in the same way it was before, if not better. The next step was to actually make car drive on its own and after a few failed attempts at coming up with logic for the car, we turned to neural networks.
Machine Learning Needs Data
Since with neural networks we really can’t get anywhere without gathering a large data set, it’s time to roll out the car and gather sweet data. Like any explorer venturing out into the unknown, our car will want to record all of its experiences for future self reflection. This means that we’ll need one mobile device to drive the car (from the implementation above), and another device with a camera strapped to the front of the car.

Because our budget was small we strapped a second phone to the car to record video as the car drove around. The input data we could collect was what the camera on the car can see and the logs left by the controller app as a human pilots the car with the other phone. As it turns out, this setup we had now, was the bare minimum required to train a neural network, featuring the input set and a label set.
The input set was the data captured by the camera on the car, and the label set was the input of the human driver piloting the remote car. Now how does that second set work as a label set exactly?
Imitation Learning
Do you remember the very first steps you took as a child? Chances are you did not. Even before conscious thought develops in the brain, its capacity to imitate the actions of other people are baked into the wiring of our brains and it allows for learning at an astonishing rate. Our car can’t “walk” yet but just like in the case of the baby, it’s our job to give it an example to follow.
By having a method of controlling the car and logging the input from the human, our car can learn what input it should supply to itself over time and become as good as the pilot.

Gathering the Data
We created a diagram of extreme values for the joystick. The first coordinate value being the degree of steering (x axis) and the second value being the amount of motion (y axis). Having a line of (0,0) cut through the middle of the joystick allowed for a gradient of speed between moving full force forward and moving full force backwards, reducing the wear and tear on our motors, and with maximum steering at 45 degree angles.

Below is the trigonometry that constrains the input joystick to a circle
 1float x = event.getX()- (circle.getWidth() >> 1);
 2float y = event.getY()- (circle.getHeight() >> 1);
 3
 4double distance = Math.sqrt(Math.pow(x,2)+ (float) Math.pow(y,2));
 5double angle  = Math.atan2(x,y);
 6
 7if (distance > circle.getWidth()/2){ //if outside the joystick
 8
 9    cursorX = (float) ((circle.getWidth()/2)*Math.sin(angle));
10    cursorY = (float) ((circle.getHeight()/2)*Math.cos(angle));
11
12    cursorX+=circle.getX() + (circle.getWidth() >> 1) - (control.getWidth() >> 1);
13    cursorY+=circle.getY() + (circle.getHeight() >> 1) - (control.getHeight() >> 1);
14}
15else{ //if inside the joystick
16    cursorX = x+circle.getX() + (circle.getWidth() >> 1) - (control.getWidth() >> 1);
17    cursorY = y+circle.getY() + (circle.getHeight() >> 1) - (control.getHeight() >> 1);
18}
19control.setX(cursorX);
20control.setY(cursorY);
21
22final int vector_X = (int)(circle.getX() + circle.getWidth()/2 - control.getWidth()/2 - cursorX) * 255/(circle.getWidth()/2);
23final int vector_Y = (int)(circle.getY() + circle.getHeight()/2 - control.getHeight()/2 - cursorY) * 255/(circle.getHeight()/2);
24
25int final_distance = (int) (dist*distance);
26if(vector_X < 0){
27      final_distance *= -1;
28}
29
30distance = (int) Math.sqrt(Math.pow(vector_Y, 2) + Math.pow(vector_X, 2));
31
32//get scaled values between -255 and 255 for X and between -150 and 150 for Y
33
34float dist = 0;
35if(Math.abs(vector_X) >= Math.abs(vector_Y)){
36    if(vector_X != 0){
37        dist = (float) Math.abs(vector_Y)/Math.abs(vector_X);
38    }
39}
40else{
41    if(vector_Y != 0) {
42        dist = (float) Math.abs(vector_X)/Math.abs(vector_Y);
43    }
44}
45
46int final_distance = (int) (dist*distance);
47
48final int final_X = final_distance;
49final int final_Y = vector_Y * 150/255;
The result was an input range of -150 and 150 for Y and between -255 and 255 for X, the values for Y were smaller because we didn’t want the car to move too fast but a full range of steering was crucial. Below are the results of a training session.

Each dot on the above graph represent the location of the finger on the trackpad at the time that a training image was sliced from the video. The top part represents forward motion, the bottom backwards motion and when the car steered it produced dots that form the diagonals of this hourglass shaped graph. We cut the data into a few logical sectors,
-
Forward
-
50% Forward
-
Forward Left
-
Forward Right
-
Backward
-
50% Backward
-
Backward Left
-
Backward Right
And “Stop” which proved to be pretty disastrous because at some point the car would learn to permanently stop.
Collecting the image data was somewhat easier, all we had to do was record a video while the car was being driven. Here’s a link to a sample android project that records a video and saves it to storage when you’re done, we used the same code to capture our videos and even your ordinary camera app works if you don’t want to implement anything custom. The only meta data that’s required is the length of the video and when the recording was initiated.
Combining Inputs and Labels
In order to match the correct actions with what the car is actually seeing we have to bring the two data sets together. By splitting the training video captured by the front facing camera and time stamping it into separate images we can match them to the timestamp of a log from the controller’s input.
The video was split into 4 images per second of video, although with a 30fps recording we could have gone for a lot more detail. On the other hand our mobile device could capture hundreds of actions on the touchscreen per second, requiring us to disregard most of the data for picking one log per image from the video. Both data sets where submitted to a python script to slice the videos and create matching (image, log) pairs.

After driving the car around our building for a bit, we gathered close to 7000 pairs of images and associated human control label pairs. Due our small budget and running the neural network on a phone, we had to down sample our images to 50x50 pixels so that our setup had a fighting chance of working in real time.
Using Neural Networks
This was arguably the most exciting and frustrating part of the project, the machine learning. Because we wanted the car to drive on its own we wanted the on board phone to accomplish both the seeing and the steering for the car. Both were indeed possible. We fully utilized the OpenCV Android library to obtain an image for every time the camera screen was updated as well as running a separate thread to control the Bluetooth chip on the car. We used this android project as an introduction to OpenCV and it got us to a point were we could obtain individual frames of the camera in real time. All that was left to do was to complete a forward pass on our network model with images supplied by the library’s onCameraFrame() function every time there was a new frame.
 1public Mat onCameraFrame(CvCameraViewFrame inputFrame) {
 2  mGray = inputFrame.gray();
 3  Mat mEqualized = new Mat(mGray.rows(), mGray.cols(), mGray.type());
 4
 5  //normalize the image
 6  Imgproc.equalizeHist(mGray, mEqualized);
 7
 8  //convert the frame into a scaled bitmap
 9  Bitmap bitmap = Bitmap.createBitmap(mEqualized.cols(), mEqualized.rows(), Bitmap.Config.RGB_565);
10  Utils.matToBitmap(mEqualized, bitmap);
11  final Bitmap scaled_bitmap = Bitmap.createScaledBitmap(bitmap, 50, 50, false);
12
13  //get output from the neural net model
14  int[] shape = model.get_Interpreter().getInputTensor(0).shape();
15  final ArrayList<String> output = inferencer.multiImageInference(model, scaled_bitmap, shape[shape.length-1]);
16}
At this point we could either write our own native neural network , or we could use Google’s Tensorflow Lite library to load a python Keras model directly onto the phone. We went with Keras for the simplicity and existing collection of examples we could reference.
The only downside to this approach was that because the model file could no longer be changed on the Android phone, our car would not be able to use reinforcement learning to learn as it drove on its own. Fortunately this was a sacrifice we were willing to make.
With a basic Keras Sequential CNN model we pumped an input image of 2500 pixels into the series of Convolution and Max Pooling layers. We then converged the model into a dense layer at the end to give us 9 categories of output. For each output we would get a confidence value of how much the car was willing to follow any of the given directions. This was done because it’s not important for the car to make fine movements, the categories we specified above were enough.
Neural Network Architecture
 1model = Sequential()
 2model.add(layers.Conv2D(32, kernel_size=(3, 3),
 3                 activation='relu',
 4                 input_shape=(50,50,10),
 5                 name='my_layer'))
 6convout1 = Activation('relu')
 7model.add(convout1)
 8model.add(layers.MaxPooling2D(pool_size=(2, 2)))
 9model.add(layers.Conv2D(64, (3, 3), activation='relu'))
10convout2 = Activation('relu')
11model.add(convout2)
12model.add(layers.MaxPooling2D(pool_size=(2, 2)))
13model.add(layers.Dropout(0.25))
14model.add(layers.Flatten())
15model.add(layers.Dense(128, activation='relu'))
16model.add(layers.Dropout(0.5))
17model.add(layers.Dense(numBins, activation='softmax'))
Above is a Keras model we used for our car. It is relatively small and the gist of it is that it converts a 50x50 array of an input image into an array of 9 confidence outputs for each of the joystick colored sectors.
After a few weeks of tweaking we settled on this model that worked fairly well, giving us a 95% success rate with a sizable test set of 30% of our entire training database. The laststep was to save the Keras library as a tflite file and feed it to the Interpreter on the phone.
Tensorflow Lite has the amazing functionality of exporting the python written model into a tflite file which can be used by a Tensorflow Lite interpreter on any other system.
 1model_json = model.to_json()
 2with open("model.json", "w") as json_file:
 3    json_file.write(model_json)
 4
 5keras_file = "model.h5"
 6model.save(keras_file)
 7
 8converter = lite.TFLiteConverter.from_keras_model_file(keras_file)
 9tflite_model = converter.convert()
10open("model.tflite", "wb").write(tflite_model)
This model is simply loaded as a TFLite interpreter object which can then use the simple run() function on an input image to create a prediction.
 1public Interpreter load_internal_model(String model_name) throws IOException {
 2        tfliteModel = loadModelFile(model_name);
 3        tflite_interpreter = new Interpreter(tfliteModel);
 4        return tflite_interpreter;
 5}
 6
 7private ByteBuffer loadModelFile(String model_name) throws IOException {
 8        AssetFileDescriptor fileDescriptor = activity.getAssets().openFd(model_name);
 9        FileInputStream inputStream = new FileInputStream(fileDescriptor.getFileDescriptor());
10        FileChannel fileChannel = inputStream.getChannel();
11        long startOffset = fileDescriptor.getStartOffset();
12        long declaredLength = fileDescriptor.getDeclaredLength();
13        return fileChannel.map(FileChannel.MapMode.READ_ONLY, startOffset, declaredLength);
14}
Now taking this model we can saved it into the memory of our phone and run it with the TensorFlow Interpreter to simply do a forward pass on the model.
 1float[][][][] float_pixels = new float[1][50][50][num_saved];
 2float[][] outputVal = new float[1][9];
 3
 4for(int i = 0; i < 50; i++){
 5    for(int j = 0; j < 50; j++){
 6        for(int b = 0; b < num_saved; b++){
 7            float_pixels[0][i][j][b] = (float) int_bitmaps.get(b)[i*50+j]/255;
 8        }
 9    }
10}
11
12try{
13    tflite_interpreter.run(float_pixels,outputVal);
14}catch (Exception e){
15    e.printStackTrace();
16}
17
18//outputVal is now contains confidence values for all the sectors
The sector with the highest confidence was taken as the action to execute by the car and finally all the pieces were in place.
Conclusion
At this point we had the car built, data collection set up and a neural network dictating the controls. The car was driving with the expertise of a 6 year old with a controller. It can safely be said that we were not winning any Grand Prix any time soon but the car was able to drive around on its own without crashing itself, with surprising reliability.
In any case we were happy that something that we’ve built over a semester while taking our other classes could actually learn on its own and accomplish such a difficult task, with minimal input from us. As a first project in machine learning this was a tough one to start with but looking back at it, the approach we took was in line with any other standard machine learning task.
If you’re still reading, hopefully you’ve learned something new and if not at least enjoyed our amateur struggles. Again, all the code is available here https://github.com/RoboticsCourse, please consider starring it and checking out the contributors.

